
About
The University has an HP T610 Designjet large-format printer for teaching, research, and other University business. There is as yet no policy regarding personal printing, so for now please use the printer for University business only.
The printer is located in Carlson Tower, Rm. C-25. The ID badges for all faculty and staff should be able to open the room for you; just make sure you've synced your ID with a hotspot on campus. There is a hotspot in Carlson Tower on the first floor to the right of the elevators (if you're facing the elevators).
The T610 is able to print on paper up to 44 inches in width. Currently, 36 inch wide bond paper is loaded in the printer. If you wish to print on other media, please contact Johnny Lin to discuss the options.
Hanging on a string taped to the refigerator next to the printer is a printer log. Please record any print jobs on the log. In the log, "Linear Feet" refers to the length of paper you use for your print job (i.e., length along the roll of paper).
Directions for printing from Windows and Mac OS X are given below. Links about the printer are at the bottom of the page. Note: In early 2011, some people have had problems with printing over the network. If that's the case with you, take your own personal laptop, install the T610 drivers on your laptop, plug in the T610 printer into your laptop's USB port, and print to the T610 as if it's a regular printer attached to your laptop. You'll still need to follow the paper sizing directions, etc., described below.
Printing From Windows
Bring your file with the poster to the printer on the second floor of Carlson Tower. You may bring your own laptop, the file on a zip drive, or have your poster file on your account in the NPU computer system. All the PCs in C-22 can print to the T610 printer. To print:
- Turn on the printer by pushing the power-on button on the top of the T610 printer.
- Log onto a computer in Carlson 22.
Add the T610 printer/plotter as the selected printer.
- Go to Add a printer. Select Connect to this printer
- The printer name is: "\\print-1\Carlson25 Plotter"
- Click on "next"; a new screen will appear
- Select "No" when asked about making it the default printer. Click on "next". And on the next screen, click on "Finish".
- Configure your preferences.
- Click on "Print".
- Select "Scale" to paper size: "Custom". (Make sure what you set matches what's in the paper. By default, 36 inch wide paper is loaded into the printer.)
- On the print screen, click on "Properties".
- Select the Features tab.
- Choose Print document on B1(JIS)
- Click "OK".
- You should be good to go!
Printing From Mac OS X
You can print from a Mac on the T610 by using Bonjour. Below are instructions for printing a 4 feet wide × 3 feet high poster created in Powerpoint. (Note that the height of such a poster is equivalent to the width of the roll of paper in the printer, since the poster will be printed sideways.) Adapt the instructions for your own job as needed. I assume you've plugged your laptop into the network or into the printer's USB port:
- If you haven't downloaded the T610 driver and added the printer, please do so. The driver can be downloaded from the HP site. Using the Printer Setup Utility, add the printer as normal. The utility is found in the Utilities subdirectory in the Applications directory. See here for directions for versions of Mac OS X older than 10.3.
- Open the "Page Setup" window, either through the "File" menu option
or the button on the "Print" window.
In "Page Setup", set the size of your slides to
48 inches wide, 36 inches high,
and set the orientation of your slides to landscape.

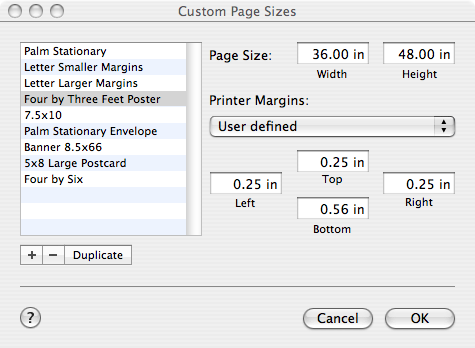
- In the "Page Setup" window, click the "Options ..." button, then select "Paper Size" and then "Manage Custom Sizes".
- In the "Custom Page Sizes" window, create a new paper size, and
set it to 36 inches in width, and 48 inches in height.
The default margins are usually fine (usually 0.25 inches
all around except 0.56 inches at the bottom).
- In the "Page Setup, Options" window, select your newly created
paper size in the pulldown menu. Select the landscape
feed icon (where the direction of feed is parallel to the
top and bottom of the image) to specify orientation.

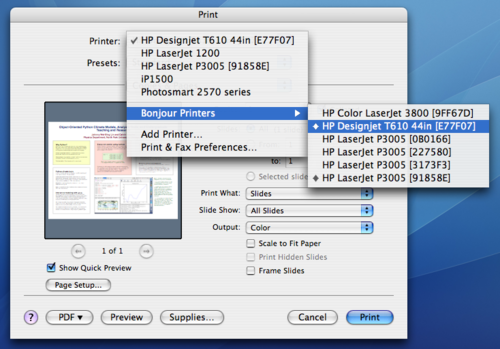
- Go to the "Print" window and under the "Printer" pulldown
menu, select "Bonjour Printers" and select the Designjet
option.
- You're all ready now! Just click "Print" and your job will print.
Links
- Building Your Presentation Poster: Directions on creating and printing your poster, by Prof. Linda Vick, Biology Department, North Park University.
- HP Designjet T610 Printer Series: Overview and Features
- HP Designjet T610 Printer Drivers and Software Download